Here you can achieve your any artist’s invention.
This block is controlling the behavior of our created Ragdoll.
Here you are able:
- Make the Ragdoll follow your animation
- Turn off animation following completely
- Make the steps above just for a part of the hierarchy
- Bake received simulation into Dynamics cache
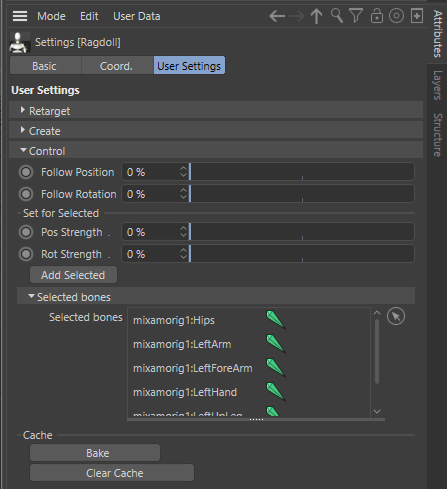
Follow animation #
The first four fields are responsible for the animation inheritance.
First two – for all bones, last two (under the “Set for Selected”) – for selected bones only.
0% means the Character will not follow the animation at all. In the result the Character just will fall on the ground like the expected dead body Ragdoll.
100% – means the Character will completely inherit your animation.
Position and Rotation difference. Position 100% inheritance means that the joint during physical simulation will strive to position from its animation key. Rotation 100% means – the joint will tend its rotation from the animation key.
For example: your character has the animation of the running forward. You have the tornado forces in your scene. If you will set the 100% position inheritance and 0% rotation for only the legs, and 0% pos and 0% rot for body, when you hit the play, the whole body will be sucked into a hurricane, but legs will still run in their position from the animation. Like the character is glued to a treadmill by his legs. But if you change it vice versa – 0% for pos and 100% rot (still for the legs), then the whole character will be sucked into a hurricane. But at this time he will swing his legs in the air and nothing will hold him on the ground.
Just experiment with the different combinations.
You can use any animation. You can download it from the Mixamo, or create your own. You can mix the animation with physics, animate mixing strength in time, and set up it for a different parts of body separately. All of it helps to achieve an amazing results!
Add Selected #
Add Selected – adds all selected joints into the field which now will be controlled separately. After assigning the second pair of sliders take control over all joints in this field. Also this button sorts objects in selection and considers joints only (useful for the interactive selection).
- Select the bones you want to set another strength
- Click the Add Selected button.
- Set the strength via sliders under the “Set for Selected”-group
- Enjoy the result!
Add Selected button also deletes everything from the Selected bones field, if nothing selected.
When you click this button the code deletes everything from the field-list and adds the bones which are selected now.
- Bake the dynamics cache via the “Bake” button
- Clear the cache via the “Clear” button
How to achieve the result like in this video? #
- Create Ragdoll
- Connect the wrists of the character to a machinegun with the Connectors in the mode Fixed or Hinge(better).
- Add forces to the machinegun: the recoil, the chaotic movements etc. I’ve used the simple vibrate tag in a different modes.
- Select the top-part of the body – arms, shoulders, wrists, chest – and add it to the plugin selection
- Set the Follow position and Follow rotation (the force of muscles) to 0% for all ragdoll and set Follow rotation 60-100% for the selected.
- I’ve additionally made an animation for the selected: 0-40 frames it has 0% Follow rotation to achieve the illusion that the character does not expect the blow. And from the frame 40 the Follow rotation for the hands and chest grows to 60-100%. To make the feeling that the character tries to put the efforts to hold the crazy object in his hands.